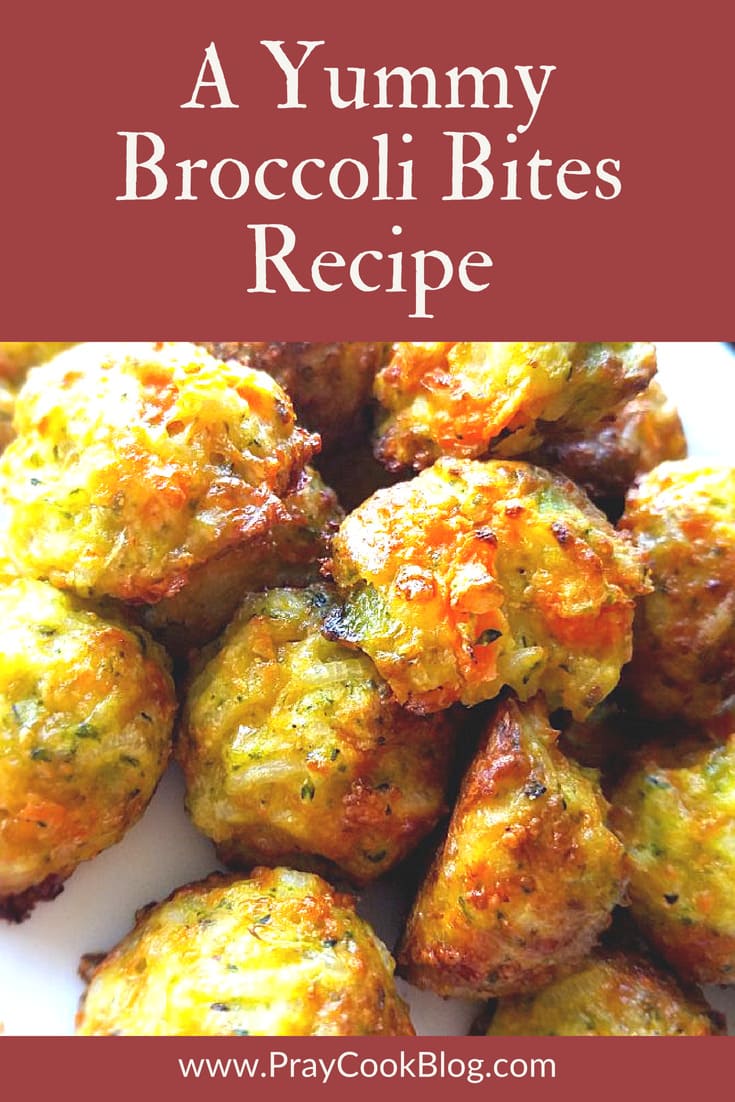
Tag Archives: Healthy

French Apple Tart

twd french apple tart finishedIt Tuesdays With Dorie which means I have baked from Dorie Greenspan’s book,  Baking With Julia.  I’ve never made a french apple tart and this week’s recipe got my attention. Dorie writes, “This open-faced tart is beautiful … beneath the gossamer blossom is what the French call a compote, a sweet, thick purée of oven-roasted Granny Smith apples.”  Are you interested?
mosaictwd apple french tart
In Dorie’s cookbook this recipe takes up 2 1/2 pages. That turns me off.  I took one look down through the recipe and thought it seemed so time-consuming.  My best baking projects are fast and easy and look like they took a long time.  :) Yes, I am fickle like that.  But, I am happy to report — this isn’t nearly as time-consuming as it seems at first glance.  And the finished tart is … well, worth it!  Also, my granddaughter, Tayler, is here visiting and she cheerfully helped me as my Chief Designer!

twd pie pastry squishFirst things first …the recipe calls for 1/4 recipe Flaky Pie dough.  This has become my very favorite pie dough recipe and you can get it here. I was immediately happy and “all in” because I keep this pie dough frozen for just such a moment as this!  I thawed the pastry dough over-night in the refrigerator. First thing in the morning I placed it in my 9″ springform pan and baked it.  While it was baking I started chopping apples.
twd fr apple tart applesThe recipe calls for Granny Smith apples.  I used mostly Granny Smith and a couple of Gala apples too.  Apple chunks are tossed with sugar, flour, cinnamon and fluffy bread crumbs.  This recipe calls for very little sugar but the result won’t give it away.  What intrigues me is that those apples could be cooked down in a pan on the stove or in a skillet stove-top.  But instead, it calls for spreading them on a baking sheet and roasting them.  Interesting.

twd apples  to roastBefore I started this recipe I decided I wasn’t going to take pictures except of the finished tart. As you can clearly see I went for my camera before I finished slicing the apples.  The colors are so pretty and I so want to share that with you!  The apples roasted for 20 minutes and were gooey, caramelized and wonderful! THAT picture would have gone right here … but I forgot to take it! :(

mosaictwdfrench apple taylerThe roasted apple compote is spooned into the baked pastry shell.  At this point my chief designer, Tayler, began working her magic.  We peeled apples, dipped them in lemon juice (to help keep them from browning) and she began the task of layering the apples. We had room for two circular layers and one rosette in the middle.  After brushing with melted butter and sprinkling with Turbinado sugar, our tart baked for 30 minutes.  The tart was done but the edges not quite dark enough so I turned the broiler on for just 2 minutes to give the edges the stunning black effect. The recipe suggests sprinkling with white sugar but I always keep Turbinado on hand and if you do too, then by all means use it for the sprinkling on the top.

twd french apple tart crystalOur tart didn’t stay under this cover long since it was the crowning touch to our Sunday dinner shared with family.

twd french apple tart bookThis tart is not overly sweet making it a perfect finish to any dinner.  (Only 3/4 cup sugar in the entire tart.)  The roasted apple purée is a perfect contrast to the crackle of the crust and the pure apple flavor of the topping.

The contributing baker for this recipe is Leslie Mackie.  This recipe is hosted by TWD baker, Gaye of Laws of the Kitchen.  She will post the full recipe on her blog.

As for me and my family — we will be making this again!!

Blessings and Happy Cooking!
~Catherine

“Be not deceived; God is not mocked: for whatsoever a man soweth, that shall he also reap. For he that soweth unto his own flesh shall of the flesh reap corruption; but he that soweth unto the Spirit shall of the Spirit reap eternal life.” Galatians 6:7-8 ASV

Terri Conner liked this post

Healthified Skillet Tuna Noodle Casserole

Skillet Tuna Noodle finalVisiting with my son Cory over the Christmas holidays, he offered me a great suggestion for my blog for the new year. Cory is a fantastic cook and is always looking for the healthiest of recipes for his family.  It is no surprise that he suggested I add a recipe each week that is “healthified.”  Never heard of healthified? Thanks to Cory it is my new buzz word for 2013!  According to the Live Better America website healthified™ recipes are made by either subtracting or substituting ingredients, to create healthier versions of the recipes you love!
mushrooms and onionsOne of Cory’s most wonderful traits is that when he offers a suggestion he is ready and willing to help make it happen!  So I wasn’t surprised when he told me he had just made a very healthy version of Tuna Noodle Casserole that is delicious, healthy and low-fat!  Starting with a good bit of mushrooms and onions cooked in olive oil, salt, pepper, and white wine is added.  By this time the kitchen is smelling yummy as the smells begin to waft through the house.
tuna noodle add noodlesFlour, milk, peas and Parmesan cheese are added to the cooked veggies to make up the white sauce.  Cooked whole-wheat pasta not only adds a deeper flavor than white pasta, it is also lower in carbohydrates and higher in fiber. :)

Skillet Tuna Noodle finalPanko bread crumbs, Parmesan cheese and a quick turn under the broiler and dinner is served!  Cory added broccoli instead of peas and said it was a tasty variation.  We shared some of our casserole with neighbors just returning from Christmas travels.  After serving to my family we still had enough left for another meal.  We ate the remaining casserole about 4 days later and the flavor had enhanced and the Chief thought it tasted even better!

Please let me know if you have a healthified recipe you want to share.  I will be on the look-out for the best healthy recipes to bring back to you!

Happy New Year and Happy Cooking!
Stay healthy, Catherine

Healthified Skillet Tuna Noodle Casserole

Prep Time: 40 minutes

Total Time: 40 minutes

Yield: 6 to 8 servings

1 1/3 cups each

406 Calories

8 g Fat

Healthified Skillet Tuna Noodle Casserole

A beloved recipe, healthier than ever and tastier than you thought possible!

Ingredients

  • 8 ounces whole-wheat egg noodles
  • 1 tablespoon extra-virgin olive oil
  • 1 medium onion, finely chopped
  • 8 ounces mushrooms, sliced or chopped
  • 1/2 teaspoon salt
  • 1/2 cup dry white wine
  • 6 tablespoons all-purpose flour
  • 3 cups nonfat milk or 2% milk
  • 1/2 teaspoon freshly ground pepper
  • 12 ounces canned chunk light tuna drained *See Note
  • 1 cup frozen peas, thawed
  • 1 cup finely grated Parmesan cheese, divided
  • 1/2 cup coarse dry Panko breadcrumbs

Directions

  1. Bring a large pot of water to a boil. Cook noodles until just tender, 6 to 8 minutes or according to package directions. Drain and rinse.
  2. Heat oil in a large oven-proof skillet over medium heat. Add onion, mushrooms and salt. Cook stirring often until the onion is softened but not browned, about 5 to 8 minutes. Add wine and cook until evaporated, about 4 to 5 minutes. Sprinkle flour over vegetables, stir to coat. Add milk and pepper and bring to a simmer stirring constantly.
  3. Stir in tuna, peas, and 1/2 cup Parmesan until evenly incorporated. Stir in cooked noodles -- the pan will be very full! Remove from heat.
  4. Position rack in upper third of oven and preheat broiler.
  5. Sprinkle the casserole with breadcrumbs and the remaining 1/2 cup Parmesan cheese. Place under broiler and broil until bubbly and lightly browned on top, 4 to 5 minutes.

Notes

Make Ahead Tip: Prepare through step 3, spoon into an 8 inch square glass baking dish, cover with foil and refrigerate for up to 1 day. Sprinkle with breadcrumbs and cheese (from step 5) and bake, covered, at 350 degrees for 50 minutes. Uncover and cook until browned and bubbly, about 10 more minutes.

Note: Chunk light tuna, which comes from the smaller skipjack or yellowfin, has less mercury than canned white albacore tuna.

Recipe adapted from www.eatingwell.com

Schema/Recipe SEO Data Markup by ZipList Recipe Plugin
http://praycookblog.com/2013/01/03/healthified-skillet-tuna-noodle-casserole/

Terri Conner liked this post

Fried Green Tomato Parmesan

I am absolutely torn up about what recipe to share next.  We have been canning and freezing up a storm and so those recipe seem timely.  But then my Chief Culinary Consultant and main-man gardener starts bringing me the most beautiful green tomatoes and all other recipes fly out the window!It all started very innocently when the first green tomatoes were used for the typical Fried Green Tomatoes – Southern Style. The Chief especially liked the fried green tomatoes and was wondering out loud “when will we have them again?”  I, on the other hand wasn’t quite so ready for another round. At the same time I was busy cooking up fresh marinara sauce from the ripened tomatoes the garden is producing en masse. It was at the end of a marathon cooking session and the need for dinner that I decided to make Fried Green Tomatoes Parmesan.  I figured I could use some of the days fresh marinara sauce and make the Chief happy with some more fried green tomatoes.  WHAT a surprise dinner we had!  All I can say is MOVE OVER chicken and eggplant because we have a new Parmesan in our house!

I started by adding Italian seasoning to my cornmeal mix that became the breading for the tomatoes.
Don’t be alarmed about all that grease.  When the grease is hot and these are fried quickly, they aren’t greasy at all.
I laid these to rest on a paper towel while I readied the baking dish.
I added browned Italian sausage to my freshly made marinara and spread a little bit in the bottom of the baking dish.  The tomatoes were layered with a sprinkling of Italian Blend cheeses.  Look at this marinara!  Please excuse me for bragging, but it is some of the best I have ever made. I layered the rest of the tomatoes, marinara/meat mixture and more cheese. I baked this for 30 minutes and then topped with Parmesan and baked a few more minutes.
When it was all said and done the Chief, my sous-chef dish-washing mom, and I decided our new favorite dish is Fried Green Tomato Parmesan!  I served this with a tossed green salad and it was all D-E-L-I-S-H!

PRINT the recipe from my Tasty Kitchen Recipe Box.

~Blessings, Catherine

“By day the LORD directs his love, at night his song is with me— a prayer to the God of my life.” Psalm 42:8 NIV


All Hail to the Kale Chip!

Walk Through The Bible In One Year
Week 21 reading plan Job 14 through Job 42
Click on the colored link to read each day’s scripture.
Monday Job 14-18, Tuesday Job 19-22,
Wednesday Job 23-28, Thursday Job 29-32,
Friday Job 33-36,   Saturday Job 37-39,
Sunday Job 40-42

Experiencing the Bible come alive is such a joy this year. If you are reading along with me then you will be right in the heart of the book of Job. Even though many people think they “know” Job because of the phrase … the patience of Job, the real story of Job goes so much deeper than patience. I follow an outline provided by World Outreach Church and if you want to Dig Deeper I am providing a link to some very good summary information for this weeks reading!  Blessings as you read!


It’s the beginning of a new week, the middle of June, and summer is in full swing! I have just returned from a fabulous family reunion. At any minute I am expecting any one of my 35 reunion relatives to come through the door as was the case during the last week. We were in and out of each others cottages and enjoyed our mealtimes together. We rocked crying babies, swam with the toddlers and witnessed a 6-year-old water ski for the first time! I have an incredible emptiness and longing to be back in the heart of those activities.  For now, my solace will be the memories we made.


Now, how about I stop blubbering about reunions and talk about FOOD!  :) What do you know about Kale?  Until earlier this year all I knew about kale was that it was considered “greens” and I didn’t like it.  I hadn’t ever actually tasted Kale, but I was sure I wouldn’t like it.  Then my Chief Culinary Consultant needed a big boost of iron and kale took on a whole new meaning to me.  The Chief grew up eating greens and is most content to eat collard greens, turnip greens or kale anytime he gets a chance.  We planted collards and kale early in the spring and have fresh from the garden every week.  Every day the Chief eats a mess of kale and collards along with whatever else is being served.  His iron is improving and my ability to fix kale and collards is also improving :)

Then one day I receive an email from Simply Scratch and what do you know … Laura is making KALE CHIPS!  It seems that Kale Chips have popped up around the internet in a trendy sort of way for the last year.  At the heart of the kale craze is a salty snack called kale chips. They are, quite simply, fantastic. Crisp, light and pleasantly salty, they’re the perfect treat for a junk-food fan. I don’t eat cooked Kale.  But, one bite of the Kale Chip and all of my skepticism was blown away!


Kale chips have half the total fat of their potato counterparts. The more kale chips you crunch on, the more cancer-fighting antioxidants you feed your body, the more vitamin A you flood your system with (promoting eye health and great skin), the more heart-healthy fiber you load up on. How many snack foods can boast that?  And … they can be made very fast and easy at home for a whole lot less than a bag of store-bought chips!

Start with washing and drying a bunch of kale.  Cut out the stem leaving nice pieces of the curly green stuff.  Once it is good and dry toss with olive oil.


You can get creative with the next step.  You can go simple and sprinkle on some salt and pepper and call it good.  Or, The Newlywed Chefs post a recipe calling for a sprinkling of celery salt and pepper.  For me, I used celery salt and garlic Southern Seasonings.  Turned out a great combination!

After the oil and seasoning the pieces of kale are placed in a layer on a cookie sheet and baked.  Baking time varies depending on how big you leave your pieces of kale.  I made mine kinda small and next time I am going to leave them in a bigger chunk, but still removing the stem.  They are baked until the edges are just a little brown, the middle is still green and the kale has turned crispy, about 5 to 8 minutes at 400 degrees.  Several bloggers mentioned they are great with beer!  Who am I to argue?

Wishing you a tasty start to the week!

This week Tuesdays With Dorie features a incredible French Strawberry Cake!  I will also be announcing the winner of the Baking With Julia cookbook.

~ Blessings, Catherine

All Hail to the Kale Chip

Serves 6
Prep time 15 minutes
Cook time 5 minutes
Total time 20 minutes
Website Adapted from The Newlywed Chefs
Get on board with the kale chips craze! Healthy snacking, economical, easy and oh-so delicious!

Ingredients

  • 1 bunch Kale, destalked and torn into bite sized pieces
  • 2 tablespoons Olive Oil
  • 1/2 teaspoon Celery Salt
  • 1/2 teaspoon Black Pepper
  • 1/2 teaspoon Your favorite seasoning (I used Southern Seasonings Garlic)

Directions

1 kale drying on towel
Preheat oven to 400 degrees F. Wash and dry kale. Remove Stems.
2 kale chips olive oil
Place kale in large bowl. Toss kale and olive oil together until the kale is evenly coated. Sprinkle with celery salt, pepper, and your favorite seasoning. Toss well.
3 kale chips ready to bake
Transfer kale onto baking sheets (2 -3), making sure pieces aren't overlapping. Bake for 5 to 8 minutes or until kale has crispy and brown edges but green centers.
4 kale chips handful
Cool and transfer to a bowl for crispy, crunchy, healthy snacking!
Related Posts Plugin for WordPress, Blogger...